
React1
[TOC]
1.三个API
React.createElement(): 创建React元素
React.createElement(type,[props],[…children])
第一个参数:元素的名称(小写:div)
第二个参数:元素的属性({id:’btn’}),使用对象形式
在设置事件的时候,属性名需要修改为驼峰命名法,并且在后面不能写方法,只能写函数名,React帮你调方法。
class需求使用className来代替。
第三个参数:元素内容
用来创建React元素
React元素无法更改,使用新创建的元素进行替换。ReactDOM.createRoot():获取React根元素
createRoot(container[,options])
用来 创建React根容器,放置React元素。root.render()
root.render(element)
当首次调用时,容器节点的所有DOM元素都会被替换,后续调用就会进行比较,只修改有变化的DOM。
不会修改容器节点,只会修改容器子节点。可以在不覆盖现有子节点情况下,将组件插入已有的DOM节点。当后续调用render渲染页面的时候,React会比较两次渲染的元素,只有在真是DOM发生变化的才会更新,没有变化的保持不变。
例子:
1 | <div id="root"><div> |
1 | // 创建React 元素 |
2. JSX
在React中可以通过JSX来创建React元素。
JSX需要被React翻译为JS,才能被React执行。(使用Babel来翻译)
JSX其实就是React.createElement()的语法糖。
2.1 JSX注意事项
不要加引号,错误:“
12>”有且只有一个根标签,必须有一个根标签。
html标签小写开头,React组件标签大写开。
可以使用
{}插入js表达式。属性正常写(class –> className;style –> {};事件名大驼峰)。
标签必须闭合。
{}中的布尔类型,null,undefined会被忽略。
2.2 JSX中列表渲染
使用map
1 | const arr = [ |
3.虚拟DOM
在React中操作的元素叫做React元素,并不是真正的原生DOM。
React通过虚拟DOM将React元素与真实DOM进行映射。
好处:
- 降低API复杂度
- 解决兼容问题
- 提升性能(减少不必要的DOM操作)
React使用diffing算法,将新旧DOM进行比较,替换更改的DOM,保留不变的DOM。
比较时,React会先比较父元素,如果父元素发生了改变,就直接替换该元素,不再比较子元素。如果父元素一致,则往下比较,直到发现不一样的节点。
4. 组件
4.1 函数式组件
适用于简单组件
1 | export default function Hello() { |
在父组件引入挂载。
函数式组件,在没有hooks之前:
- 没有生命周期,但是会被更新并挂载
- 没有this(组件实例)
- 没有内部状态
4.2 类式组件
1 | import React from 'react' |
其中render函数位于类实例上。
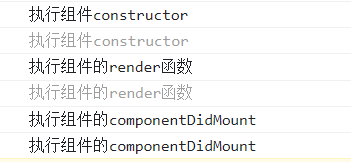
当这个类组件被root.render解析的时候,发现这个组件是一个类组件,所以就帮你创建了一个当前组件的实例,随后调用该组件上的render方法。
最后将root.render返回的虚拟DOM转为真实DOM,展现到网页上。
4.3 补充
render函数可以:
- 返回React元素:
通过JSX创建
- 数组或者fragments、
使得render返回多个元素
- Portals:
渲染子节点到不同的DOM字树中
- 字符串或者数值类型:
在DOM中被渲染为文本节点
- 布尔类型或者null:
什么都不渲染
5. React中的生命周期
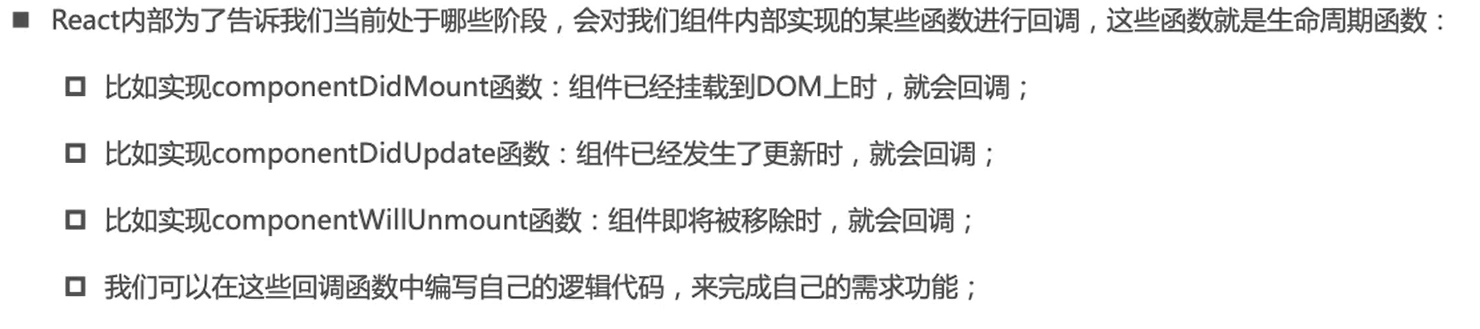
5.1 生命周期解析
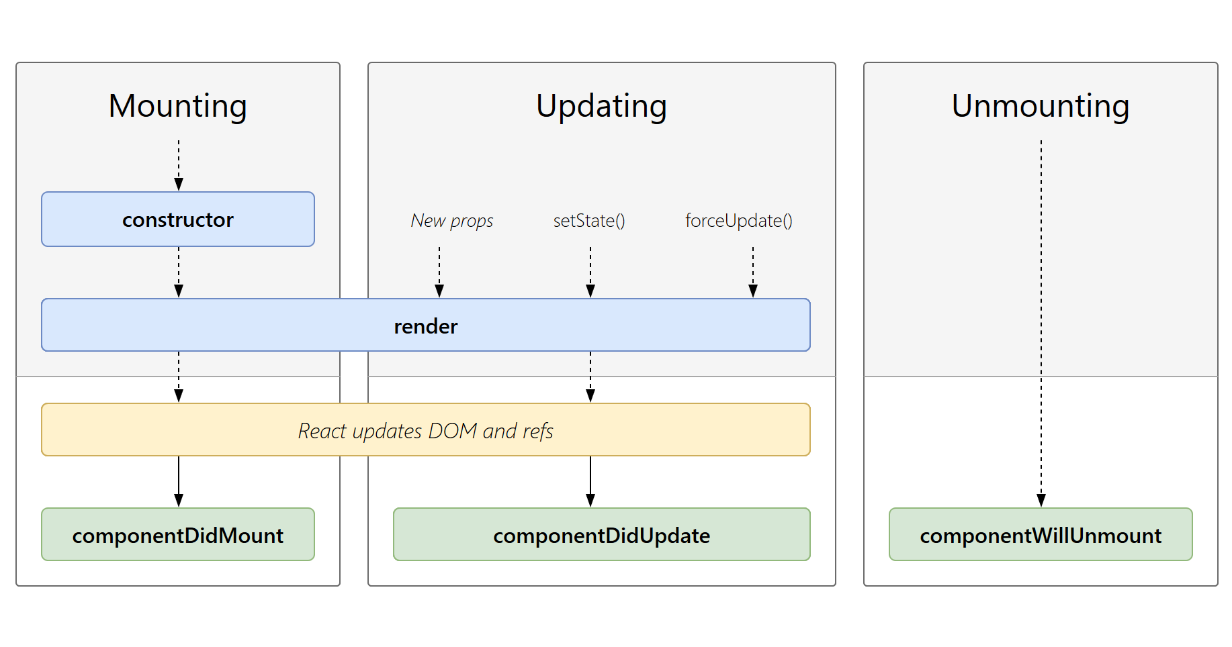
- Mounting:挂载阶段
- Updating:更新阶段
- Unmounting:卸载阶段
1 | import React from 'react' |
在组件更新的时候,会调用componentDidUpdate生命周期函数;当组件卸载的时候,会调用componentWillUnmount方法。
Constructor:
通过this.state赋值对象来初始化内部的state
为事件绑定this。
componentDidMount:
依赖DOM的操作在这里执行
在此处发送网络请求
添加订阅
componentDidUpdate:
当组件更新后,在此处对DOM进行操作
如果更新前后props进行了比较,可以在此处网络请求
componentWillUnmount:
在此方法中执行必要清理操作
比如:timer,网络请求,创建的订阅
6. 组件间的通信
6.1 父子组件之间的通信
6.1.1 父传子
使用props
- 类式组件
父组件:
1 | import React from 'react' |
子组件:
1 | import React from "react"; |
结果:

- 函数式组件
父组件
1 | import FunSon from "./FunSon" |
子组件
1 | export default function FunSon(props) { |
结果:

- 对传递过来的属性进行验证:
当传过来的数据类型与期望类型不一致的时候,就会报错,这个时候就需要对传递的数据类型进行验证。
使用PropTypes进行验证。
从React15.5开始,这个功能被移入了prop-types库。(使用时需要单独引入)
1 | import PropTypes from "prop-types" |
我们还可以设置属性的默认值,当父组件没有传递任何值的时候,子组件就会使用默认值进行渲染。
1 | FunSon.defaultProps = { |
上面的属性验证写法,类组件同样使用,使用组件名.方法。
在类组件中还有另外一种写法:
1 | class Class extends React.Component{ |
6.1.2 字传父
在React中通过Props传递消息,父组件给子组件传递一个回调函数,子组件调用。
父组件:
1 | import React from "react"; |
子组件
1 | import React from "react"; |
父组件定义方法,并且通过props的方法将事件传递给子组件,子组件再进行调用。
6.2 如何在React中实现Vue中的slot
- 方式一
使用props.children给子组件传递组件数据。
父组件:
1 | export default class Slot extends React.Component { |
使用类式组件,将子组件引入,并且在子组件内部写上要传递的数据,这里有三个部分,到时候props.children中也会有三个数据。
子组件:
1 | export default class NavBar extends React.Component { |
控制台输出子组件中的props为:
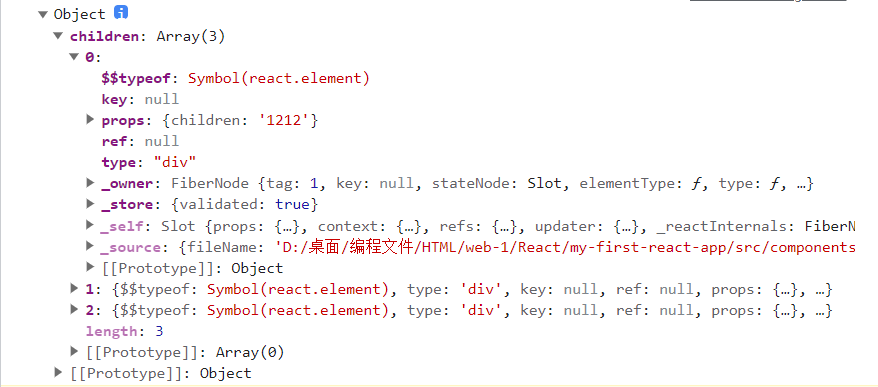
可以看到确实children中有我们组件的数据。
- 方式二
将父组件中子组件内部的数据通过props传递:

在子组件中使用对象解构,将对应的插槽给解构出来:
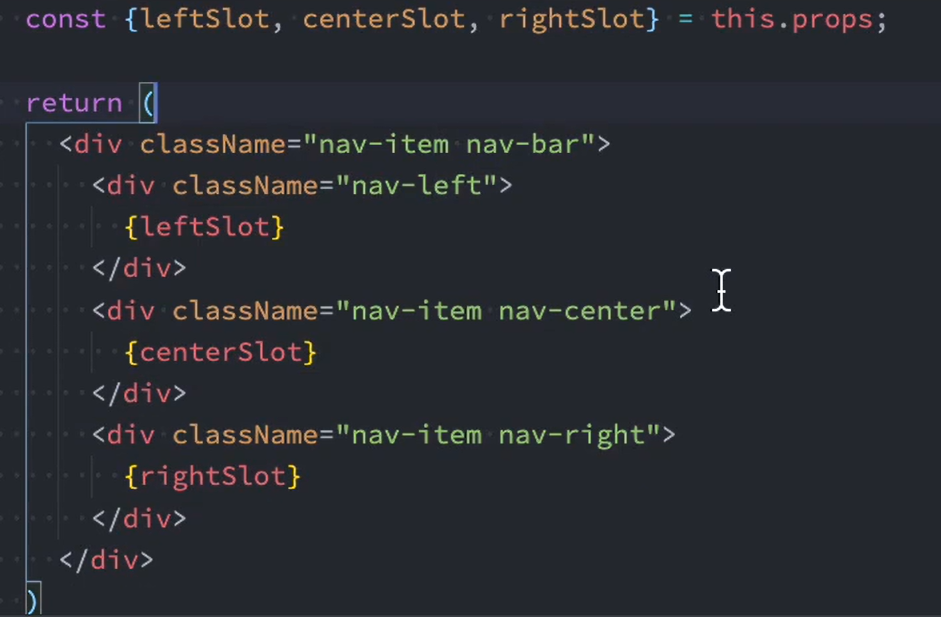
实现的效果是一样的。
6.3 跨组件通信
6.3.1 使用props进行祖先组件通信
1 | import React from 'react'; |
使用props逐层传递。
这种方法对于中间层(Son1)它根本不需要这些数据,这样就会造成性能的浪费以及后期维护成本的增加。
所以第二种方法:
6.3.2 Context实现非父子组件数据通信
Context相关API
- 创建Context对象
React.createContext()
创建一个需要共享的Context对象,如果某个组件订阅了Context,那么该组件就会寻找离自身最近的那个Provider并且读取到当前context的值。
defaultValue是组件在顶层查找中没有找到对应的Provider,那么就使用默认值。
1 | const MyContext = React.createContext(defaultValue); |
- Context.Provider
每个Context对象都会返回Provider 组件,这个组件允许消费组件(使用该数据的组件)订阅Context组件的变化。
Provider接受一个value属性,并且将这个值传递给消费组件
一个Provider组件允许被多个消费组件使用
Provider组件可以被嵌套使用,里层的数据会覆盖外层的数据
当Provider中value发生变化,所以依赖该Provider组件的消费组件都会被重新渲染(更新)。
1 | <MyContext.Provider value={"value"}/> |
- Class.contextType
挂载在class上的contextType属性会被重新赋值为一个由React.createContext()创建的Context对象。
在该类组件可以使用this.context来消费最近的Context那个值
可以在任何声明周期内方法,包括render函数
1 | MyClass.contextType = MyContext; |
- Context.Consumer
React订阅组件的变更
将函数作为子元素
该函数接受当前context的值,返回react节点
1 | import React from 'react'; |
7. setState
在上面的代码中,我们使用this.state={}的方式在类式组件里面定义了数据,如果我们直接修改里面的数据:
1 | this.state = { |
这样的操作确实把数据给更改了,但是页面不会更新,因为React察觉不到数据是否发生了改变。
7.1 setState是异步更新
也就是我们通过setState将数据更改之后,数据并不会立即发生改变,而是等到所有的数据都更新之后,才会将数据传递给页面,页面重新渲染,如果我们在setState之后立即输出该数据,我们会发现数据是没有变化的。
1 | import React from 'react'; |
点击之后,页面更新:

但是控制台输出的结果确实更新之前的数据:
- 获取更新之后的数据
方式一:在setState回调函数中获取
在setState方法里面有两个参数,setState(更新的state,回调函数)
1 | change() { |
此时拿到的数据就是更新之后的数据:
方拾二:通过生命周期获取componentDidUpdate
1 | componentDidUpdate() { |
同样可以拿到更新之后的数据。
相较于方法一,方法二比方法一更早执行,也就是先执行生命周期,后面再执行setState的回调函数。
注意:
setState在以下两种情况时同步的:
- setTimeout事件中
- 原生的DOM事件中
8.React的更新机制
React 的渲染流程: JSX → 虚拟 DOM → 真实 DOM
React 的更新流程: props/state 改变 → render 函数重新执行→产生新的 DOM 树→新旧 DOM 树进行 diff→ 计算出差异进行更新→更新到真实的 DOM